Creation Process
“The mask-maker should never have occasion to despair for want of inspiration; his field is limitless, the number and variety of subjects inexhaustible. On the contrary, he runs the danger of being overcrowded with visions of types and characters which beg to be made into masks.”
W.T. Benda 1944
Part 1 – Getting Creative
CHOOSING A CONCEPT
I love Benda’s comment above - it gets to the heart of why we make masks: there is so much inspiration as we look out at the world of human experience; so much that is begging for artistic interpretation and expression. The human face is a limitless source of mystery, intrigue, emotion, and drama. The mask-maker freezes a moment of the inner story and reveals the dignity and timelessness of the human condition.
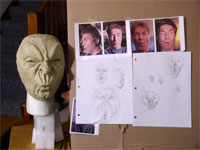
Have fun finding a character, and keep visual references handy while sculpting in clay
Once you settle on an idea for a concept, collect as many images as you can that might inspire your vision. Photos from magazines, cartoons, and drawings from various angles, if you draw. Sometimes I just go in front of the mirror and do some facial gymnastics to get an idea for a mask. The example used for our demonstration below was formed this way. I find and paste all the images on a board in front of me to refer to in the sculpting process.
MATERIALS
Clay - I like to use a wax-based like Klean Klay or an oil-based clay to make my masks. You never have to worry about it drying out or shrinking and is easier to remove in the mold-making stage.
Tools – Anything is legal. Fingers, butter knifes, spoons, toothpicks, and of course, the usual array of sculpting tools available at your local art store.
Form – I always use a mannequin head to sculpt my masks. It lets me stand the mask up vertically and sculpt in normal lighting with the same shadows and highlights that the mask will have when worn. This also allows me to view and sculpt from side angles. *Very important, remember the mask has depth. Many beginners create flat 2-dimensional masks because they are always sculpting from one position, looking down from straight overhead. Ouch, my neck!
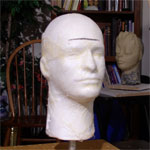
The clay mask is built on a styrofoam mannequin covered in cheesecloth.
For me, these factors far outweigh the negative ones, which are:
Clay won’t stick to a Styrofoam mannequin. I solve this by adhering a layer of cheesecloth over the surface with a polyvinyl glue. This creates a thin sculpting surface that the clay will stick to. Your new mannequin sculpting platform can be used over and over again.
It becomes a little more awkward to cast the mold with a mannequin attached to your sculpture. But easily overcome by constructing a frame, as we shall see later.
SCULPTING THE MASK
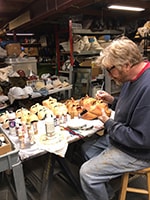
It’s definitely the time to have some fun! Much has been written about the joys of the creative process. But hey, sometimes it’s not hard to imagine what God must feel like as you bring something to life out of a lump of earth. Put on some music and get lost in it. Let time disappear. Make bold choices. Be adventuresome.
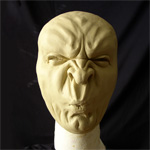
The finished clay model.
I find it best to take more than one session to finish a mask. There can be a tendency to get infatuated with lines and gestures and lose some objectively with your original concept. For me it’s better to come back the next day with new eyes.
*Note: At this point you have 2 options.
1. You can create a negative plaster mold of your sculpture. Having the plaster mold will allow you to make multiple copies of you mask in either paper-mache or Neoprene latex.
CONTINUE ON TO - Part 2 - Making the Neoprene Mask
2. If you don’t want to mess with plaster and only want one copy of the mask, you have the option of making a paper-mache positive right over the clay itself.
